
Hi friends! I’m back again today to share another card I created using some of the Simon Says Stamp coordinating dies that go with Tim Holtz Stampers Anonymous stamp sets. I’m having so much fun with these dies and am loving the fact that I don’t have to fussy cut these images anymore. Below I’m sharing how I created the background for this card. Enjoy!
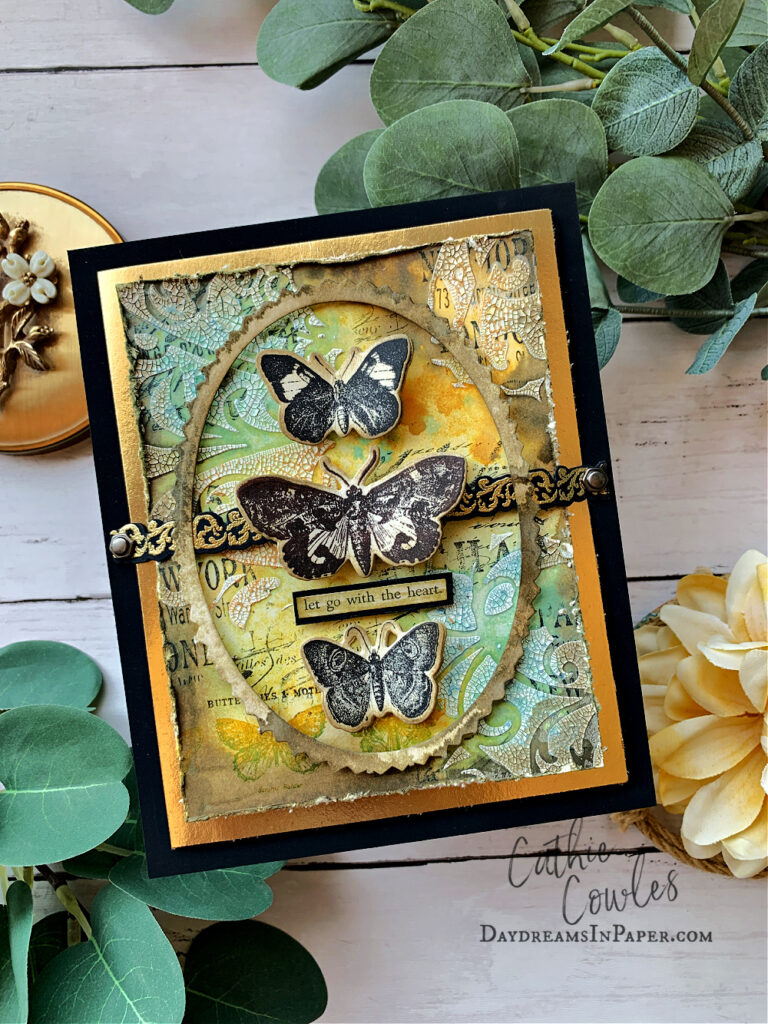
I’m loving the ornate trims. I think I’ve used them on every project I’ve created since receiving them. They are so pretty and there is no way I would spend the time fussy cutting them so the coordinating dies for the Ornate Trims stamp set has been a game changer for me. Now on to the background.
Creating the Background
Below are the instructions on how I created the background above but you can change it however you wish. Use colors you love. You can use sprays, inks, paints, oxides in whatever colors you love to work with. You can try a new combination of colors and mediums too. Choose the stamps and stencil design to go with your theme and make it your own. The main purpose is to just have fun!
Step 1:
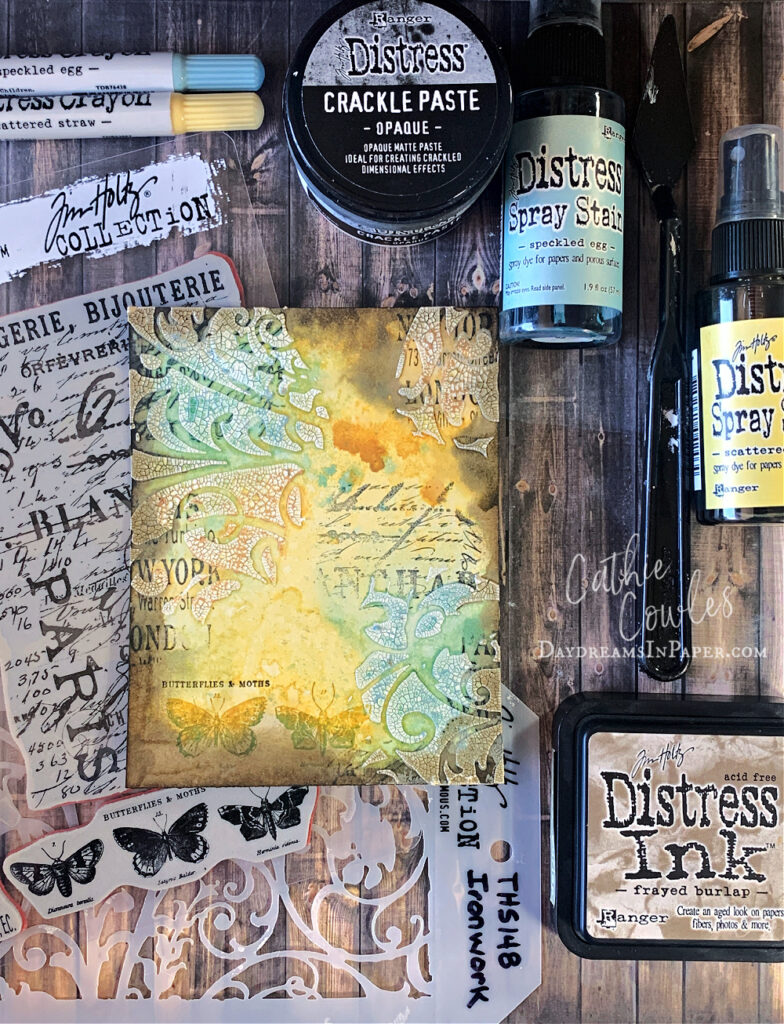
I begin by spraying 4.25″ x 5.5″ piece of Distress watercolor cardstock with Speckled Egg and Scattered Straw Distress Spray. I continue working with each color one at a time, drying each individual color in between, until I’m happy with the outcome.
Step 2:
Next, I stamp on the background in random areas with the script stamp from the Tim Holtz Stampers Anonymous Papillon stamp set (CMS106) with Ground Espresso Archival Ink. I also stamped the butterflies onto the background from the same set with Fossilized Amber Archival Ink.
Step 3:
When the ink is completely dry. I apply a stencil to the background using the Tim Holtz Stampers Anonymous Ironwork Stencil (THS148) with Distress Opaque Crackle Paste. I set the piece aside to completely dry on its own.
Step 4:
When the crackle paste is completely dry, I apply Distress Crayon very gently over the cracked areas with Speckled Egg and Scattered Straw crayon. I then apply water with a wet paintbrush to move the color in and around the cracked areas.
Step 5:
For the last step, I distress the edges of the background and then ink the edges with Frayed Burlap Distress Ink.
To complete the card, I attach the background to a 4-5/8″ x 5-7/8″ piece of Champagne metalic cardstock. I mount that entire peice onto a 5-1/4″ x 6-1/2″ piece of Distress Black Heavystock cardstock. I create an ornate trim out of black cardstock by inking one of the ornate trims onto the cardstock with embossing ink. I then sprinkle gold embossing powder over the image and set it with a heat tool. I add a frame, some of the cut out butterflies from the Papillon stamp set and a sentiment. To give the ornate trim an added flair I attach a Tim Holtz Idea-ology Hex Fastener to each end.
I hope you enjoyed seeing how I put this card together and that you find the joy of working with the new Simon Says Stamp dies that coordinate with Tim Holtz stamp sets. Thanks so much for sticking with me to the end. I appreciate the time you spend here with me.

Tim Holtz Papillon Stamps with Simon Says Stamp Coordinating Dies Bundle
Tim Holtz Ornate Trims Stamp with Simon Says Stamp Coordinating Dies Bundle
Simon Says Stamp Papillon Dies only:
Simon Says Stamp Papillon Wafer Dies
Simon Says Stamp Ornate Trim Dies only:
Simon Says Stamp Ornate Wafer Dies
Other Supplies:
Tim Holtz Stampes Anonymous Ironwork Stencil
Distress Sprays: Scattered Straw, Speckled Egg
Distress Archival Inks: Fossilized Amber, Ground Espresso
Distress Crayons: Speckled Egg, Scattered Straw
Tim Holtz Ranger Distress Watercolor Cardstock
Tim Holtz Idea-ology 8×8 Paper Stash – Metallic 3
Tim Holtz Ranger Black Heavystock Cardstock
Tim Holtz Ranger Distress Crackle Paste – Opaque
Tim Holtz Idea-ology Hex Fasteners – Retired
Tsukineko Golden Glitz Delicata Pigment Ink
Tim Holtz Sizzix Stitched Ovals Dies – Retired


