
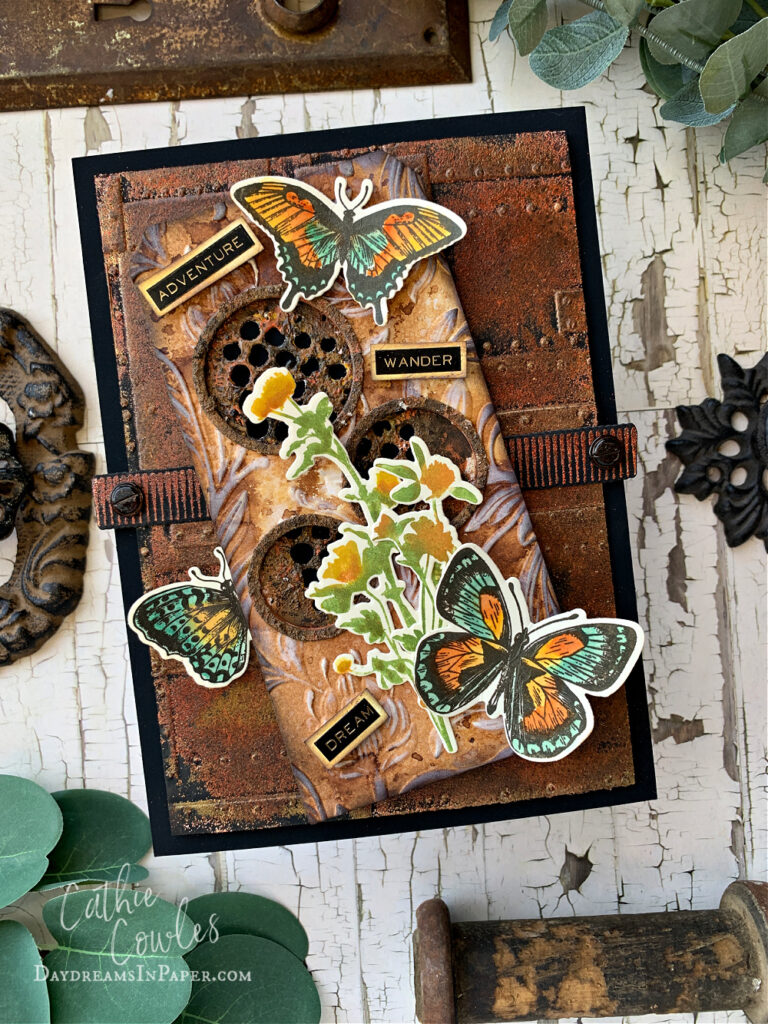
Hi friends! If you’re coming here from Instagram, thank you! As promised, I’m sharing how I created this rusty card with the items I had on hand. I wanted to create a rusty background for some of the beautiful butterflies that are in the Tim Holtz Flutters stamp set and also throw in a couple flowers from his Wildflowers stamp set and it was such a breeze cutting them out with the Simon Says Stamp coordinating dies for each set. Enjoy!
Coloring the Butterflies and Flowers
Before I get to the tutorial on making rust, I wanted to share another way I color my images.
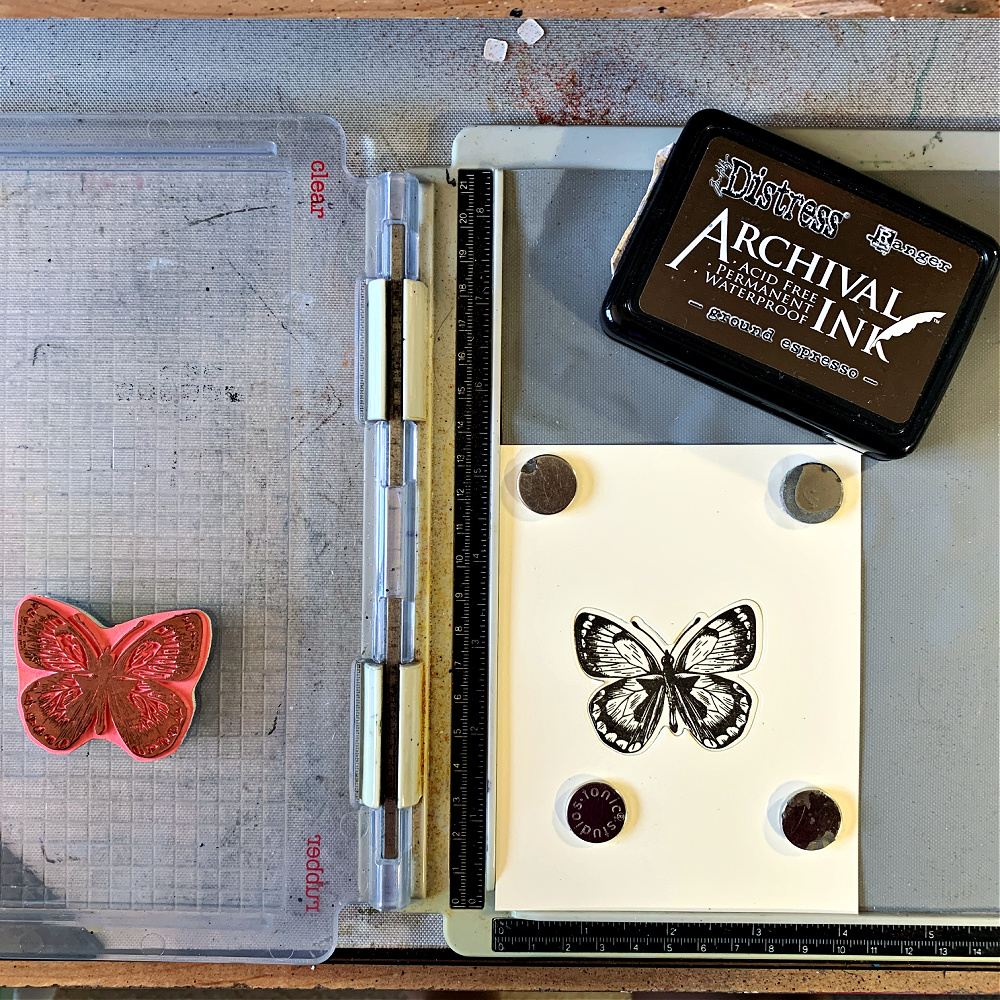
Step 1: Cut your selected image out of a scrap of cardstock with straight edges. Make sure to reserve the cut-out piece. Arrange the die cut piece in the corner of your stamping tool as shown below. Place the reserve cut-out piece to the side.
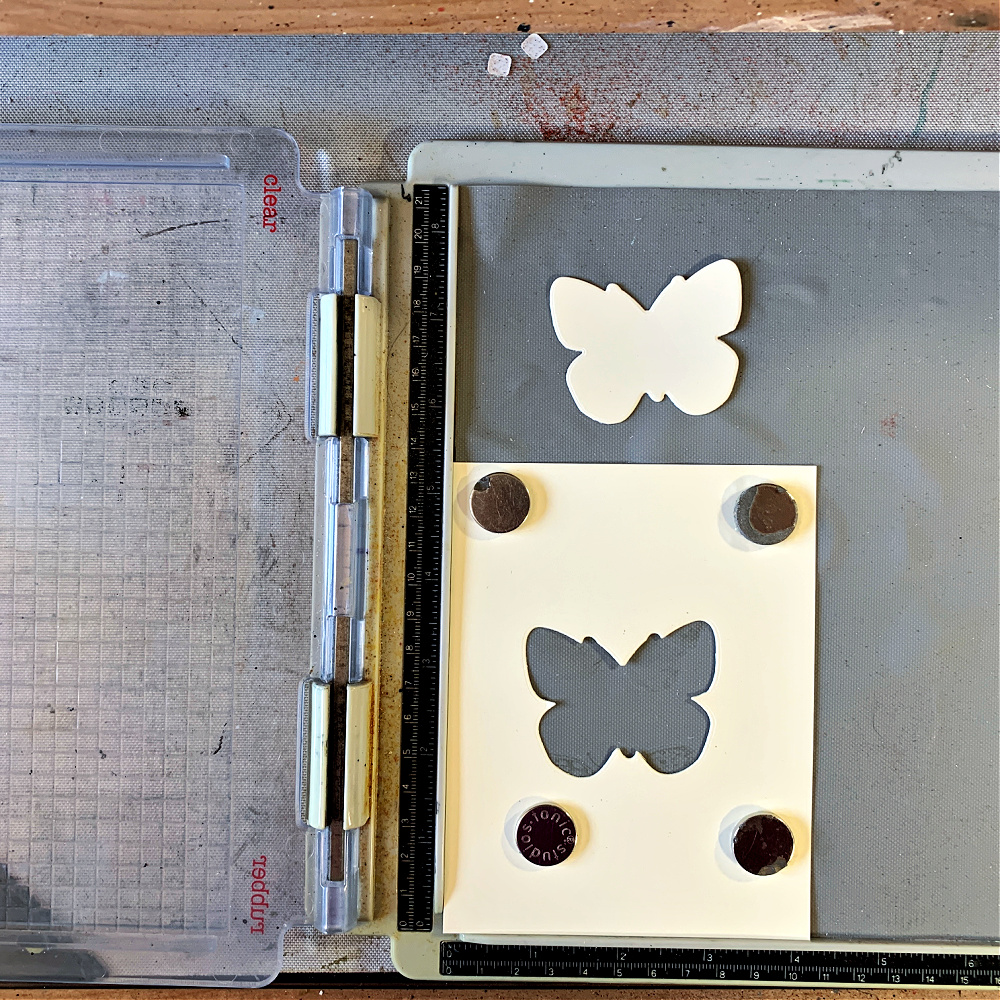
Step 2: Fit the coordinating stamp inside the cut-out area as shown below.
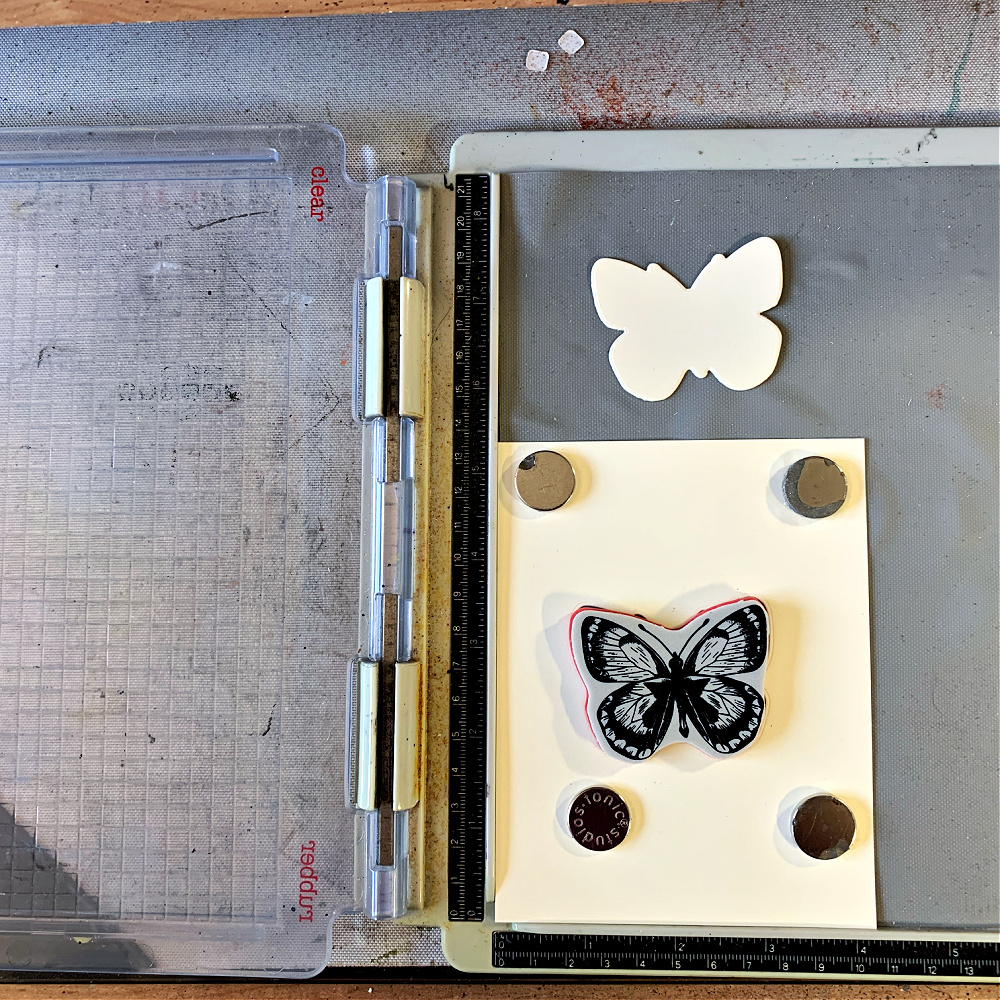
Step 3: Close the stamping tool and “pick up” the stamp for stamping. After stamping the image, DO NOT remove the stamp from the stamping tool.
Step 4: Place the cut-out butterfly into the cut-out cardstock piece and stamp the image with your choice of archival ink or any water proof ink. Do not remove the stamped butterfly, leave it in place for coloring.
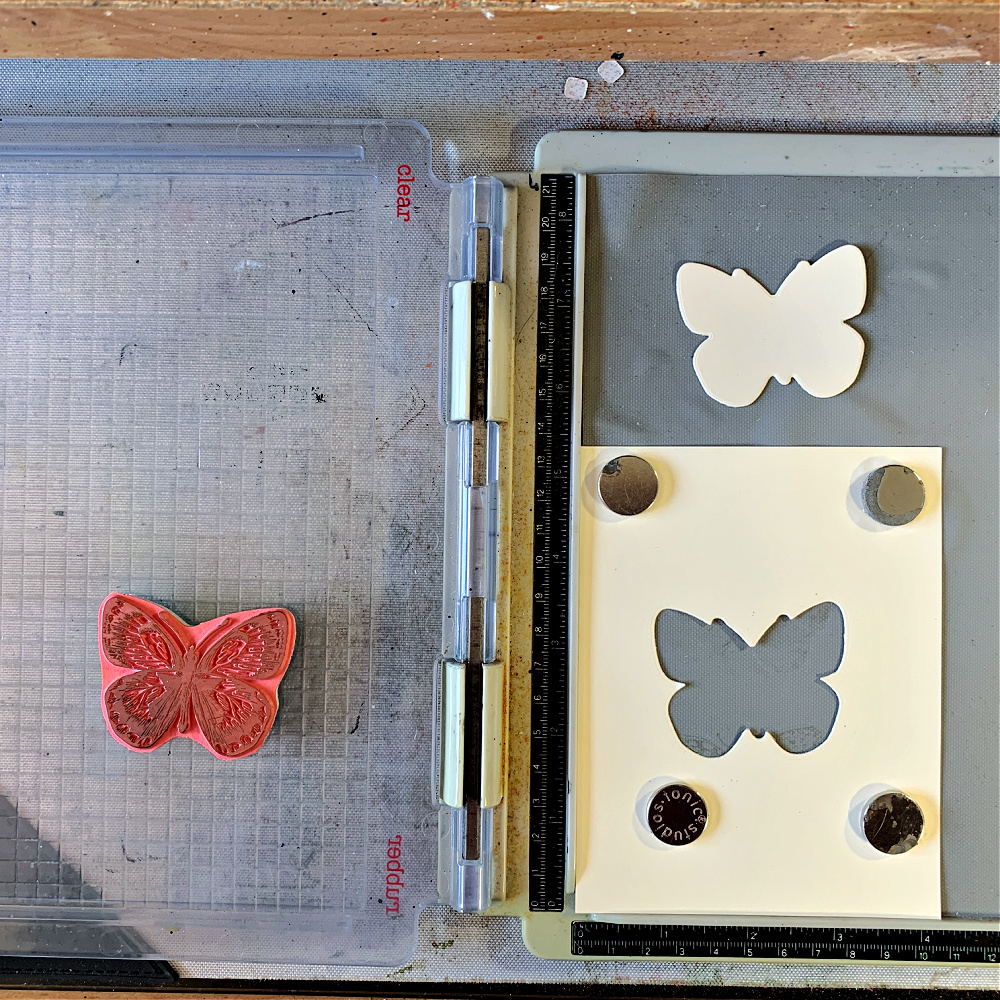
Step 5: Color the image with Distress Inks or whatever you wish while it’s still in the stamping tool. Do not remove it from the stamping tool. Heat dry the image, if needed.
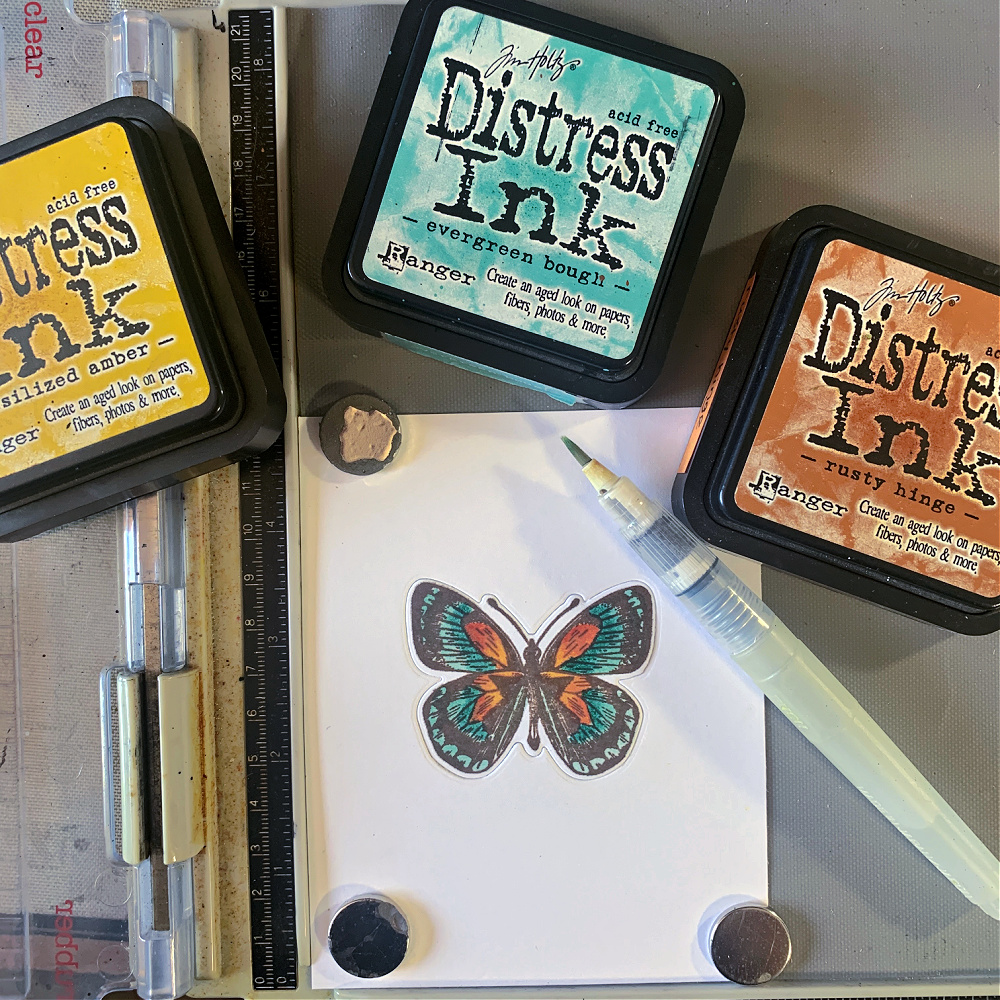
Step 6: Stamp the image again with the archival ink to make the image crisp and clear again. Remove it from the stamping tool and you’re ready to use your image on your project.
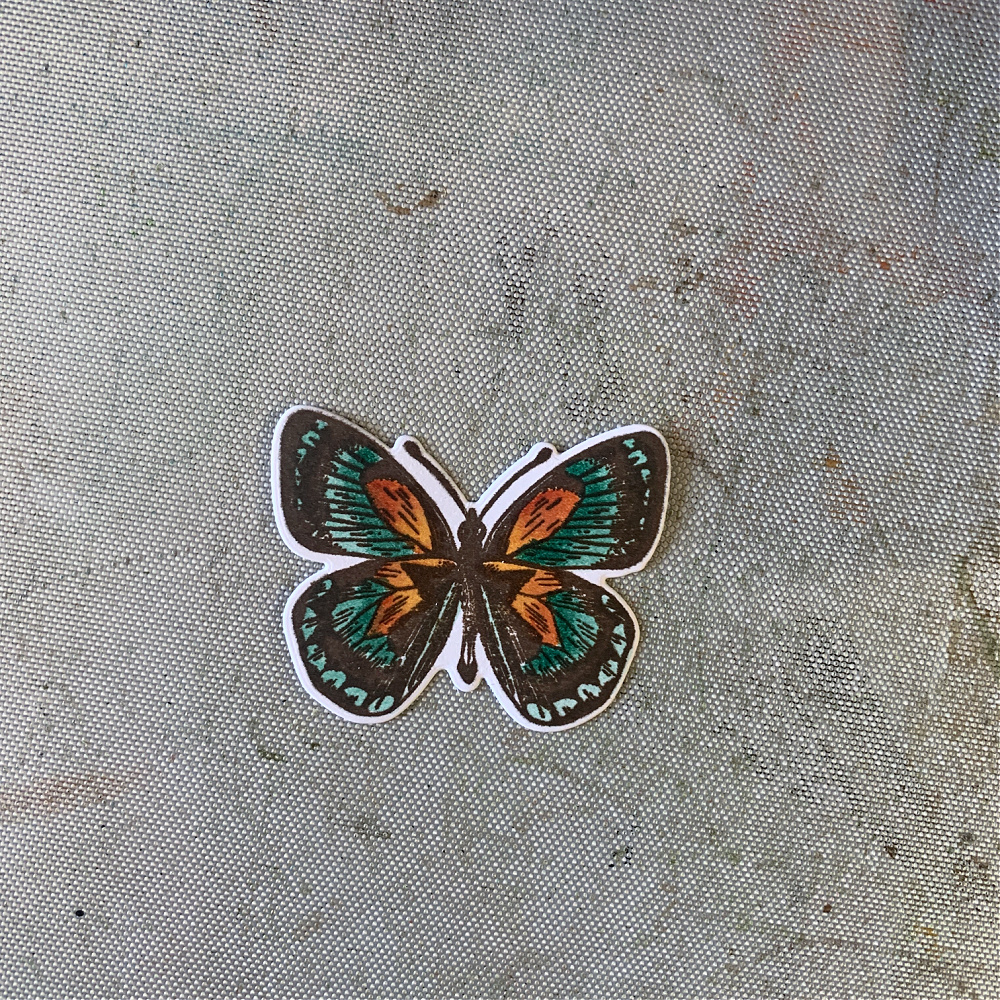
I colored all the butterflies and flowers using this same method. Now on to the rusting tutoial.
Creating Rust
I wanted to create a rusty scene for my butterflies and flowers and could only use what I had on hand. I’ve used a rusting kit in the past, but I find it is just as easy to use products I already have on hand to get the same results. First, I’m showing how to create the tag for those who are interested in how I created the piece where I will apply the rusty pieces.
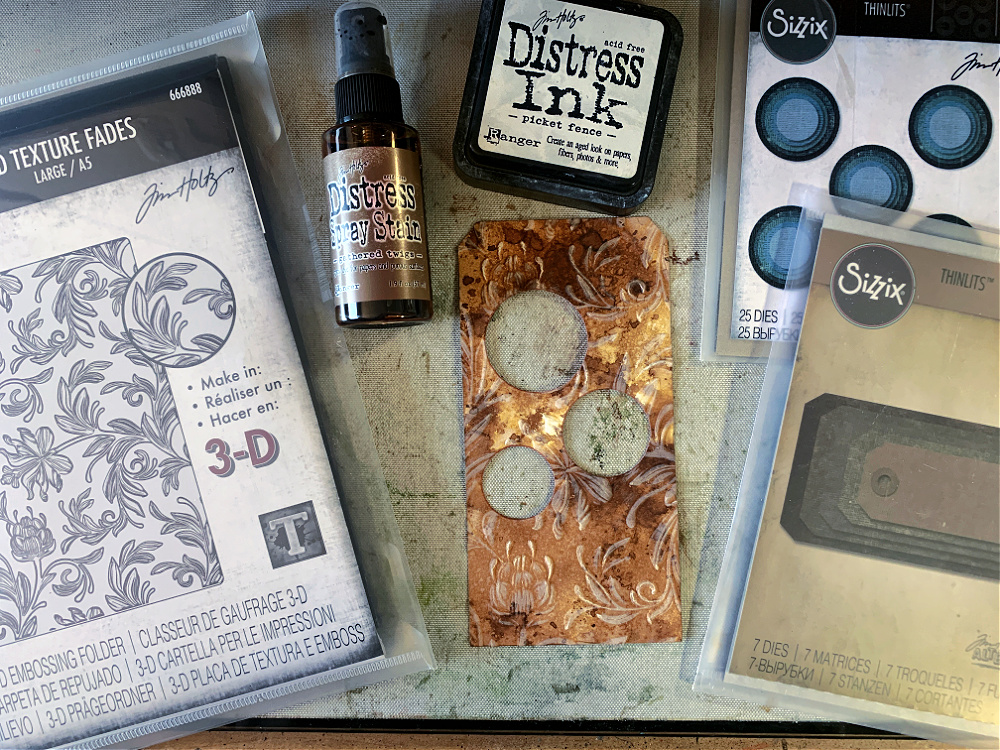
Creating the Tag: I cut out a tag using the retired Tim Holtz tag dies but any tag die will do. I used the largest one in the set. Next, I colored the tag with Gathered Twigs Spray Stain by spritzing the tag with water and then with the spray. I picked up the tag and moved it around allowing the spray to move along the surface and then dried it with a heat tool. I then picked up more color on the craft mat by dipping the tag in the overspray to create splotches and variations in color. I continued this process until I was happy with the outcome making sure to dry each layer inbetween. After completely drying the tag, I cut three holes using the Tim Holtz Stacked Circles set in random areas but mostly in the center area of the tag. I reserved the cut-out circles and will use them for my next step, so hang on to those circles. I embossed the entire tag with the new Tim Holtz Sizzix 3D Large Botanical Embossing Folder. To finish the tag, I gently ran the Picket Fence Distress Ink pad over the raised areas of the embossed image. I wanted just a slight reveal of the image so I didn’t add too much of the white ink.
Creating the Rust:
Before I get to how I rusted what you see below, I’ll explain how to make the pieces I’m going to rust. First, make a tag the same size and color as the tag you created above. Create a cut-out area with a small background die of your choice. I used one of the cut out pieces from the Tim Holtz Sizzix Mixed Media die set (660220). Make sure the die cut area will line up with the three circles on the first tag.
Now, remember the circles you reserved after cutting them out of the first tag? You will use those same circles to create the frames that will go over the circles in the first tag. Find the next smallest circle in the die set and using tape center it into the die cut circle and run it through your die cut machine. You will have the perfect little window frame for your circle window on the first tag.
Now that you have your pieces, let’s get to rusting them.
Step 1: Tap Distress Grit Paste over the die cut area on your tag. You can use your fingertips or a stipple brush, whichever you find easiest. Do the same with all three window frames. Allow them to completely dry. I set mine aside while I ate lunch so they could completely air dry. You could dry them with a heat tool to speed up the process but be sure to hold your heat tool far enough away so as not to effect the paste.
Step 2: For this next step you will want to grab 4 acrylic paints, one light brown, one dark brown, one yellow and one orange. First, cover the grit pasted areas with the light brown paint and allow it to dry slightly. Next, using a stipple brush, dot on yellow paint in random areas and allow that to slightly dry. Now do the same with the orange paint by applying it with a stipple brush in random areas. When these three colors are almost dry stipple on the dark brown paint in random areas and you will see “rust” begin to appear. Don’t worry if it doesn’t look perfect, you can continue this stippling process with the yellow, orange and dark brown paint until you are happy with the outcome. Just make sure to apply them in that order; yellow, orange and then dark brown.
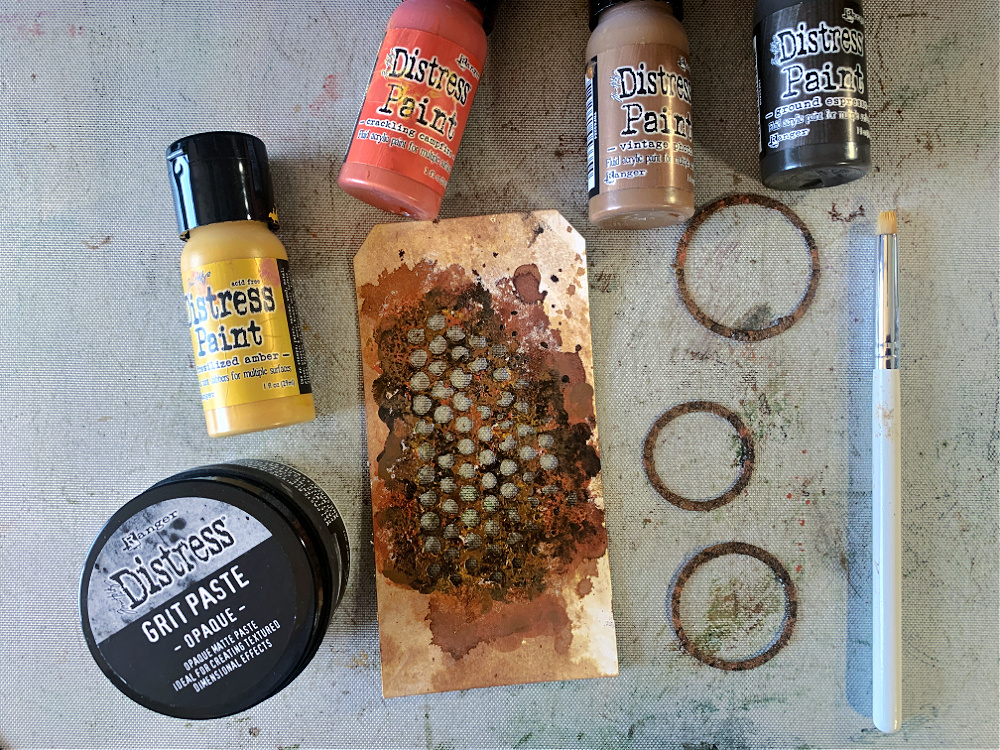
To complete the tag, glue the rusted window frames over the cut-out circles on the first tag and then adhere the first tag over the second tag with 3D foam squares to create some depth. If your cut-out design from the second tag doesn’t line up the way you like under the circles, you can always cut this piece and arrange it under the circles until you are happy with the outcome. The only part of the second tag that is going to show is what is revealed under the circles.
Here again is the completed card:
I used an entirely different approach for rusting with the larger background on the Tim Holtz Foundry embossed area. I tool a piece of black cardstock and embossed it with the Foundry 3D large embossing folder. I then ran a gold pigment ink pad over the raised embossed design and then sprinked it with gold embossing powder. I set that with a heat tool. I didn’t like that at all, so I set out to fix it. I decided to run an embossing ink pad over the area and then sprinkled it with Chunky Rust Baked Texture by Emerald Creek and set it a heat tool. I didn’t care for this either because it was too bright orange for what I was going for so I ran my Ground Espresso archival ink pad over the entire area and it that perfect. That’s the fun about creating something, you just keep working on it until you like the outcome. Of course, there are times when it’s such a hot mess the garbage can is the only solution. 😉
I hope you found this tutorial useful. So many times I get emails asking me if I have a tutorial for a particular project. I don’t always have time to make a tutorial but I do try. When you don’t find a tutorial on my blog for a particular project, just email me and I’ll be happy to answer any questions you may have.
Thanks so much for sticking with me to the end. I hope you give this technique a try and rust all the things!

Tim Holtz Stampers Anonymous Flutter Stamp Set (CMS294)
Simon Says Stamp Coordinating Dies for Flutter Stamp Set (294SSS)
Simon Says Stamp Flutter Die Set & Tim Holtz Flutter Stamp Set Bundle (SETFL25)
Tim Holtz Stampers Anonymous Wildflowers Stamp Set (CMS253)
Simon Says Stamp Coordinating Dies for Wildflowers Stamp Set (253SSS)
Simon Says Stamp Wildflowers Die Set & Tim Holtz Wildflowers Stamp Set Bundle (SETWF25)
Tim Holtz Stampers Anonymous Ornate Trims Stamp Set (CMS326)
Simon Says Stamp Coordinating Dies for Ornate Trims Stamp Set (326SSS)
Simon Says Stamp Ornate Trim Die Set & Tim Holtz Ornate Trim Stamps Bundle (SETOT25)
Tim Holtz Sizzix 3D Large A5 Embossing Folder Botanical (666888)
Tim Holtz Sizzix 3D Large A5 Embossing Folder Foundry (666887)
Tim Holtz Sizzix Stacked Tags Die Set (663118) – RETIRED
Tim Holtz Sizzix Mixed Media Dies (660220)
Tim Holtz Sizzix Stacked Circles Dies (664437)
Tim Holtz Ranger Distress Ink: Fossilized Amber, Evergreen Bough, Rusty Hinge, Forest Moss, Peeled Paint, Ground Espresso, Picket Fence
Tim Holtz Ranger Distress Spray Stain – Gathered Twigs


