
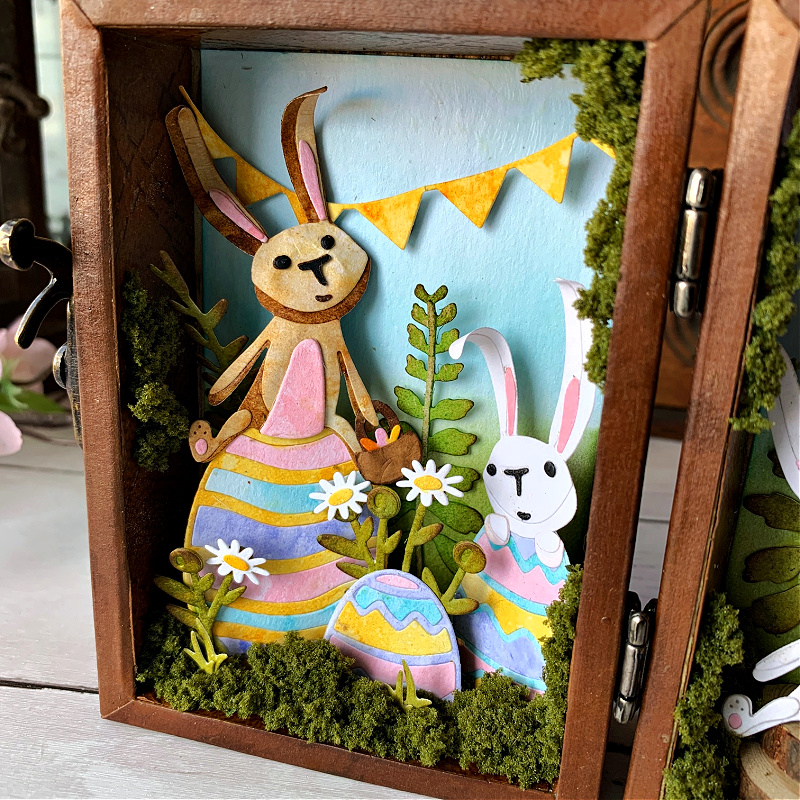
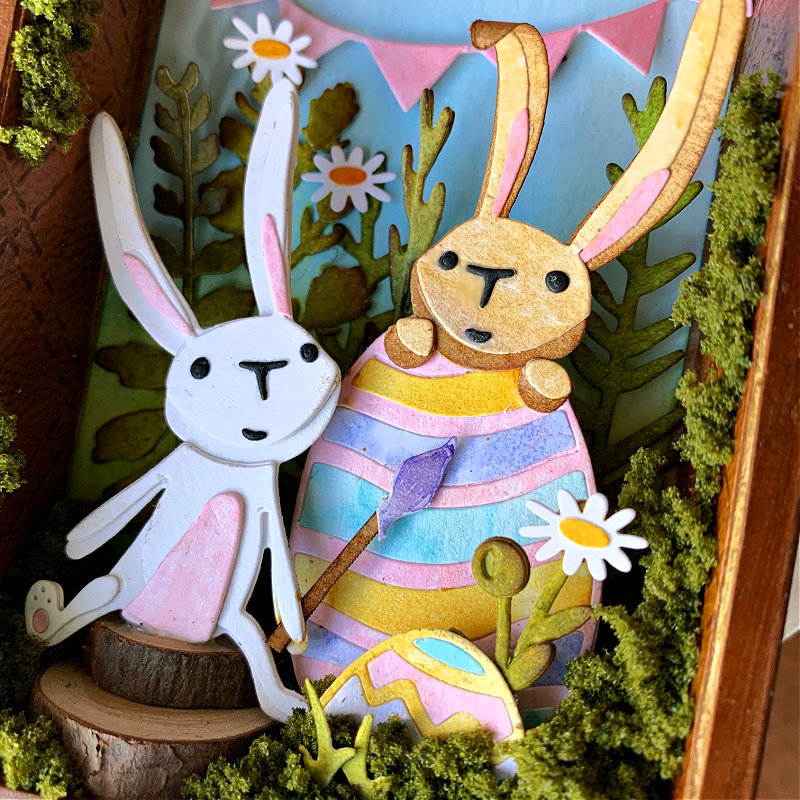
Hi friends! Today I’m sharing my make for the Tim Holtz Sizzix Chapter 1 release for 2022. I fell in love with the Quilted embossing folder the minute I saw it and thought it would make the most amazing faux leather covering on a vignette box. I love the Bunny Games die set also because of how cute it is and imagined a fun scene with bunnies preparing for their Easter time antics inside when the box was opened. I hope I was able to capture that in this vignette box. I have to admit the outside of the box is what I was most excited about so I thought I’d put together a tutorial for you on how I made it. Enjoy!
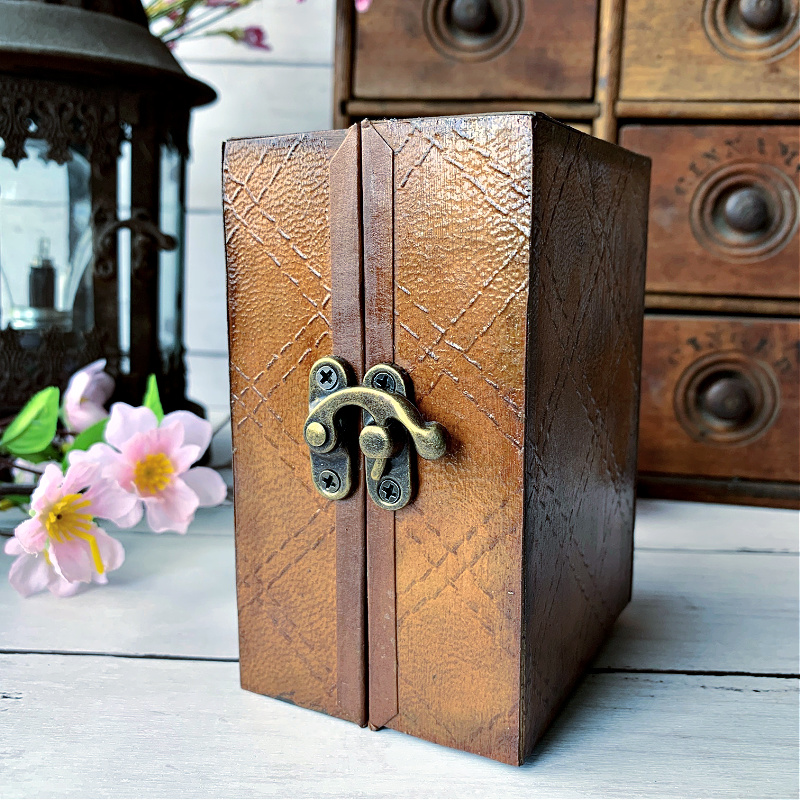
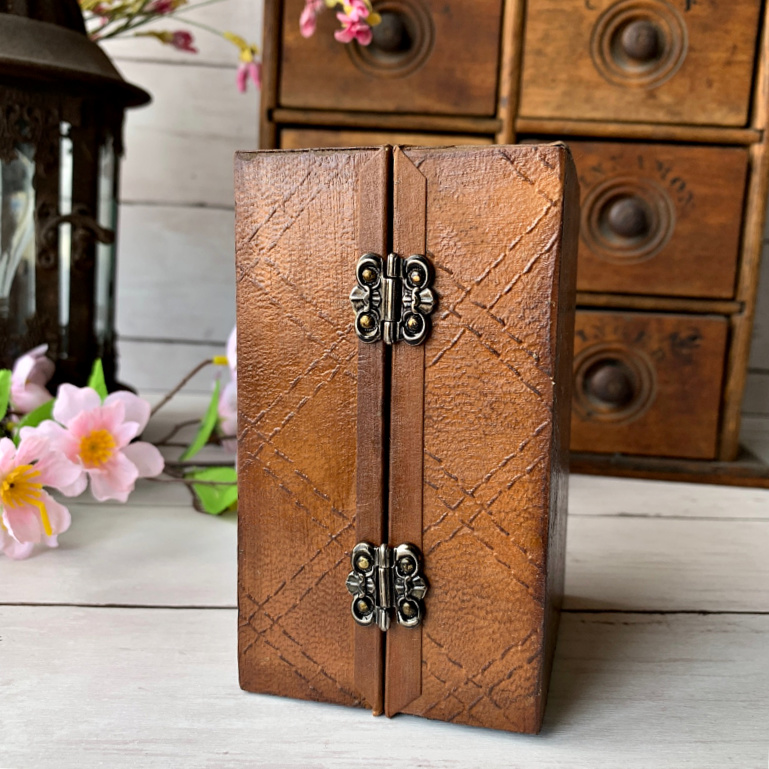
Creating the box took some time but it’s really simple and not as complicated as it may look. I wanted the “leather” that covered the box to have that slightly shiny look that real leather has, so I used a simple product you probably all have in your craft room.
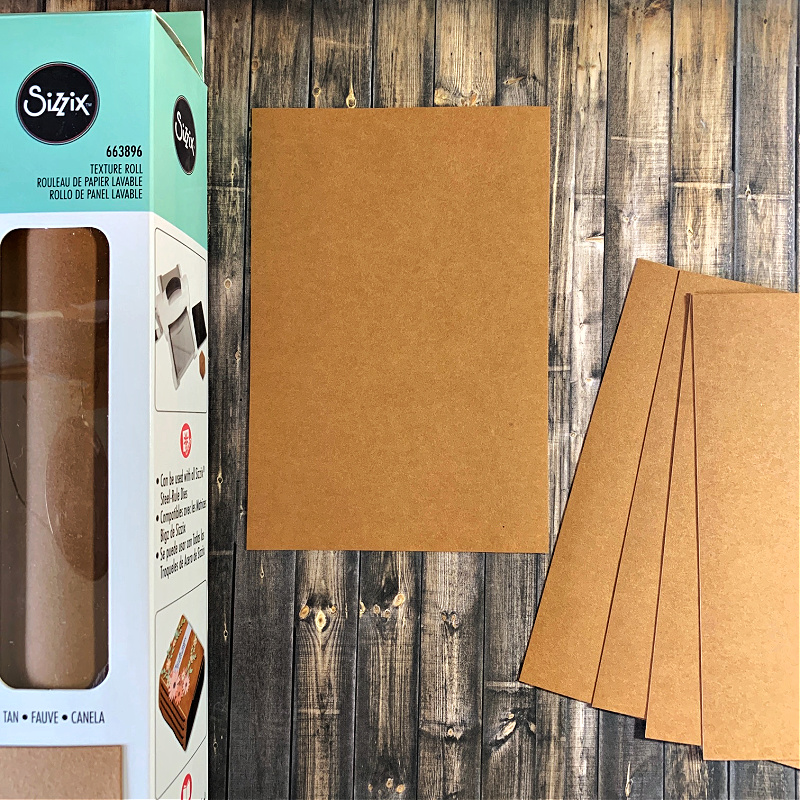
To begin, cut five 4-1/4″ x 6-1/4″ pieces of tan texture paper. This paper, made by Sizzix, comes in a 12″ roll and comes in different colors but the tan color is the one that you need to create amazing faux leather. (I have a full shopping list with links at the bottom of the post where you can find all the products I used to create this box.)
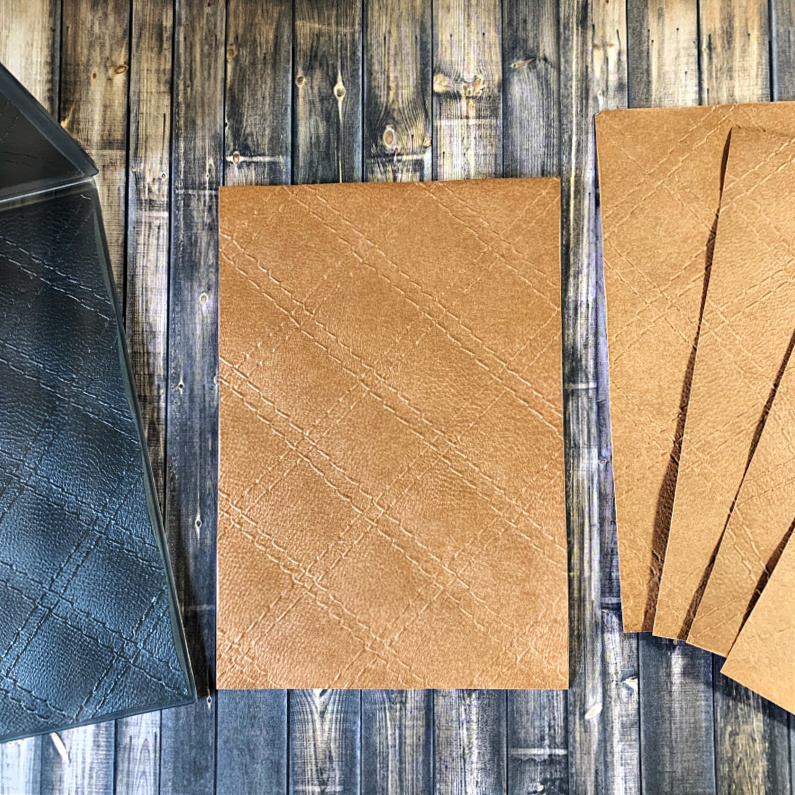
Emboss each piece with the Quilted texture fades embossing folder.

Ink each piece of embossed texture paper with Distress Ground Espresso Archival Ink as shown above using an ink blending tool. It’s important to use the archival ink because it needs to be a permanent ink that will not react to the coating of glue that will be applied. Allow the ink to dry completely before moving on to the next step. You can use a heat tool to speed up the process.
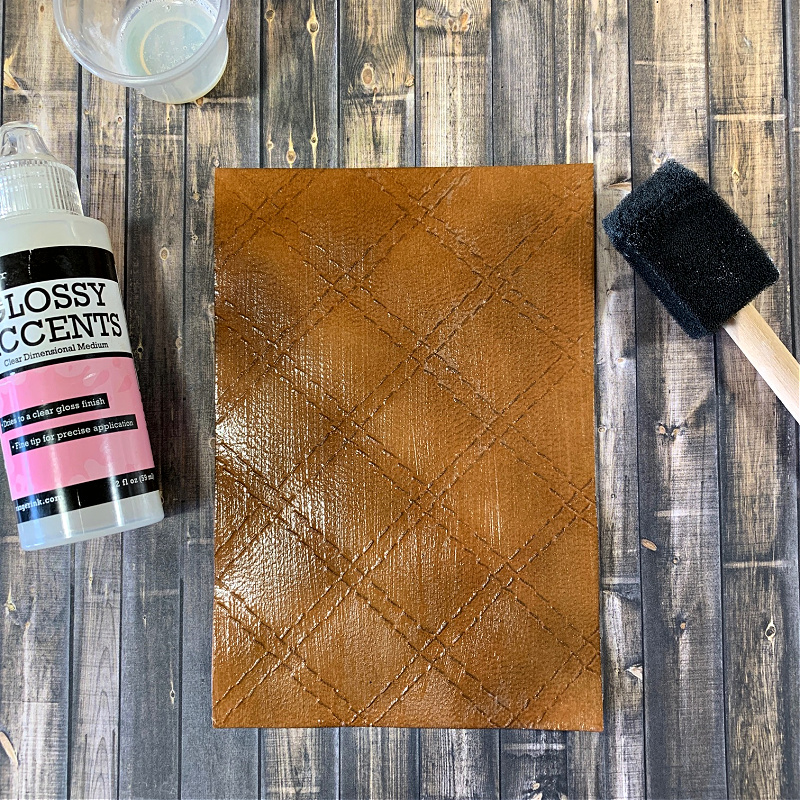
Using a foam tipped brush, apply a thin layer of glossy accents over each embossed piece. You can find foam tipped brushes at any craft store and they even have them at the dollar store on occasion. They’re very inexpensive and come in a pack with multiple sizes.
This next step is very important. After applying the glossy accents to each piece you need to set them aside on a craft mat and allow them to dry overnight. I tried to work with them after a 1/2 hour drying time and then again after an hour drying time and they were still a bit tacky to the touch. I tried again after 2 hours and then 3 hours and still they weren’t quite ready. I was worried that my idea wasn’t going to work so I let them sit overnight and checked them in the morning and they were perfect. It may be different where you live, but I live in Arizona where it is very dry so you will have to test what works where you live. Humidity has a big play in drying time which is something I don’t have to worry about too often here but just make sure the paper is no longer tacky to the touch and you’re good to go.

Now this is where the magic happens. Apply a layer of Distress Ground Espresso Archival Ink over the layer of glossy accents. Watch as you ink and see how all the little imperfections appear. This is what I loved most. The “leather” looks scratched and scuffed and, to me, added that little element that made it look even more realistic. Allow the ink to completely dry and you’re done.
I applied the “leather” to the box using Distress Collage Medium.
I hope you enjoyed seeing how I created this faux leather and that you’ll give this technique a try. Thanks so much for stopping by and sticking with me to the end. I appreciate the time you spend here with me. Have a wonderful craft-filled day!
UPDATE
I’ve had so many questions about the inside of the box and requests for close-up photos so I’m adding them here at the end of the post. I hope this helps and if you have any questions about the inside, please don’t hesitate to contact me at catherinedesigns@cox.net.

Supply List
Tim Holtz Sizzix Quilted Texture Fades Embossing Folder
Sizzix Texture Roll – Tan (663896)
Distress Archival Ink Ground Espresso
Ranger Mini Ink Domed Blending Foam
Tim Holtz Idea-ology Vignette Boxes Structures
Foam Brush Set – Find at Michael’s, Joann’s, Hobby Lobby, Amazon and Dollar Store


Looking for the hinges that you used. I could not find them in Ideaology….and what size are screws since the box is not very deep….4mm
Hi Barbara! I used two Tim Holtz Idea-ology Hinges (TH93075) to connect the two vignette boxes on the back of the box. These hinges come with brads so I had to go to a hardware store to find screws small enough because the box isn’t very deep. I couldn’t find anything short enough and the screws I used poked through ever so slightly so I was able to cover the tips of the screws that peeked through with moss. The hinge I used on the front of the box was one I found at a craft store. I had the same problem with the screws that came with that hinge as well.
The hinges have been retired, you may still find some by doing a Google search.
These hingest are still available at Simon Says Stamp. You can find them here: https://www.simonsaysstamp.com/product/Tim-Holtz-Idea-ology-HINGES-TH93075-52728
Love this project, inside and out!
Absolutely stunning! I loved many of the projects from the team designers but I have to say this was one of my favorite projects that I saw in the video of Tim Holtz today. Kudos to you and to all the the other designers.
Cathie, this is absolutely adorable! So creative putting the 2 boxes together to make a trunk. But I love the inside scenes as well!
There is nothing about this I don’t love. It is just precious.
Your box is fabulous! I loved the leather look outside. The inside was a wonderful surprise. It was so unexpected to me. I loved the whole thing!
While I was super excited to see the outside of the box, I hope you will post a short tutorial about the inside of the box as well. Love the way the box looks like old leather.
Thank you! I’m sorry, I didn’t put together a tutorial for the inside of the box but if you have any questions about it I would be more than happy to answer them. Just shoot me an email at catherinedesigns@cox.net.
Cathie Thank you for sharing. Greatly done.
Kathi, FL
This was fabulous Cathy. I adored the outside but could you possibly post a picture of the inside of the trunk? The picture on Tim’s blog is so tiny and the interior was so cute. I’d love to see the inside details better. Thanks for sharing your expertise.
Hi Mary Ellen! Thank you for your sweet comments. You can see close-ups of the inside of my box on my Instagram page with this link: https://www.instagram.com/p/CZm2AwuPd8c/
If you swipe through the Instagram post that is where you’ll find the close-ups of the inside and you can zoom in and see things in more detail. I am going to add those photos here to this blog post, as well, as I’ve had several people ask me about the inside of the box. Funny thing is, I didn’t think anyone would care much about the inside and I’ve had more questions about that then anything. I hope this helps and if you have any further questions where you need more information in detail, you can email me anytime at catherinedesigns@cox.net. I’m always happy to help in any way I can.
Hi Cathie your box is beautiful how did you get your edges so neat I have those hinges and boxes I don’t know what to do with so would love to have a go
Hi Lydia, thank you! I guess I’ve had a lot of practice with edges. They were made from strips of the Sizzix Tan Texture Roll and adhered with collage medium.
So very impressive, inside and out!! It’s quite exciting! Did I miss it or was Glossy Accents listed in the Supply List? Could it be? Thank you!!!
Thank you Verna for the sweet comments. I missed putting a link in the supply list for glossy accents, thanks for letting me know! The link has been added so I hope this makes it easier for you to find.
Thanks so much for the inside close-up’s. So cute and creative.
You are so generous to share with us. It is much appreciated.