
Hi Friends! Today I’m sharing a card I created using Distress Uncharted Mariner from Tim Holtz and Ranger. When I first saw the color I loved it. It was a blue that was definitely needed and so beautiful but when you get it in your hands and work with it, it’s not only beautiful, it’s magical!! The depth of colors and hues are unpredictable and absolutely amazing! I’ll walk you through the steps on how I created this card below using Uncharted Mariner . Enjoy!

Let’s begin:

I begin by cutting a 5″ x 7″ piece of mixed media cardstock and spritz it with water. Next, I spray Uncharted Mariner Distress Spray and Oxide in random areas and spritz again with water to get the colors moving. I dry this layer with a heat tool and continue the same process until I’m happy with the outcome. It’s important to make sure to dry each layer as you add it. Next, I spray a bit of Rusty Hinge Distress Oxide Spray in random areas and dry with a heat tool. Next, I spritz on a bit of Rusty Hinge Distress Spray Stain and mist it with a bit of water to get it moving. I’m pleased with this layer and dry it completely with a heat tool.
When the panel is completely dry, I spritz on a bit of Ranger Resist Spray and sprinkle Crusty Rust embossing powder over the sprayed areas. I melt it with a heat tool and decide it’s a bit too bright for me so I go over the embossed areas with a bit of Ground Espresso Distress ink with an ink blending tool.
Next, I apply the Focus stencil from Tim Holtz in random areas using Uncharted Mariner paint and a blending tool and allow the paint to completely dry.

Next, I prepare some ephemera pieces and some Idea-ology pieces to add to the panel.
For the metal stars I paint on collage medium with a tiny paint brush, sprinkle them with Uncharted Mariner Embossing Glaze and then heat them with a heat tool to melt the glaze. To do this easily, adhere the metal stars to a piece of cardstock or the end of a popsicle stick so you can paint all around them and heat the glaze without burning your fingers. For the metal story stick, I rubbed Rusty Hinge Distress Crayon pigment over the engraved “wander” sentiment and removed the excess with a microfiber cloth.
For the ephemera pieces, I just ink the edges with Ground Espresso Distress Ink and splatter the largest one with Walnut Stain Distress Paint. One of the round ephemera pieces was colored with Distress Rusty Hinge Distress Spray Stain.
The stamped images are from the Tim Holtz Stampers Anonymous Artful Voyage (CMS129) stamp set. It’s an oldie but a goodie and still available! I stamped these images using Uncharted Mariner Distress Oxide. When the images were dry, I cut them out with a scissors following the shape around the image and ink the edges with Vintage Photo and Ground Espresso Distress Ink.

Moving along:
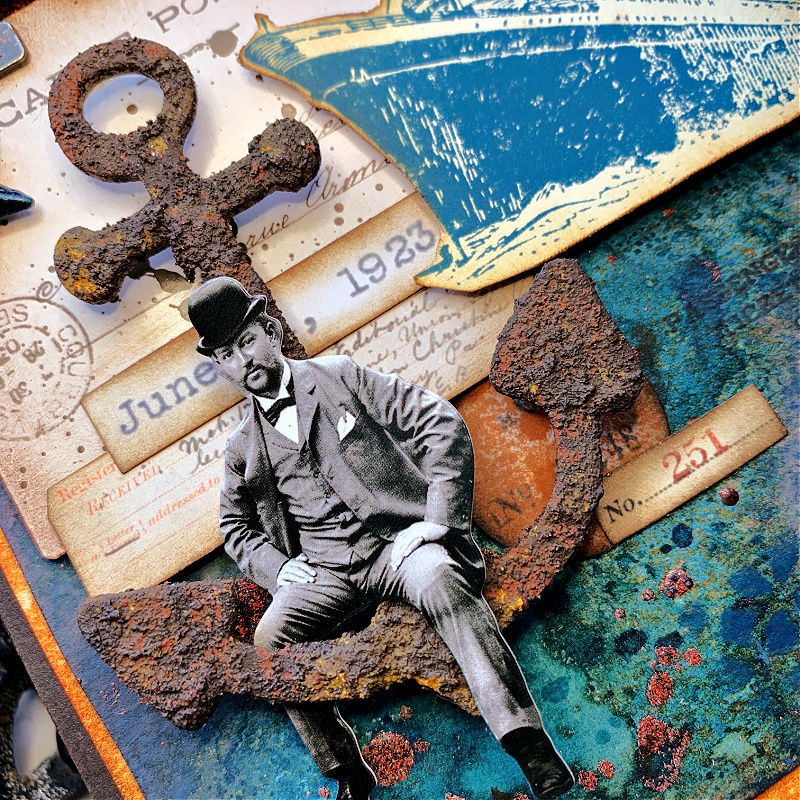
Let’s talk about the Tim Holt Mini Paper Dolls, shall we? I’m in love with these mini versions because they are the perfect size for card fronts when you don’t want the entire focus to be the paper doll. This gent sits atop a ship anchor creating the perfect addition to my Bon Voyage theme.
I treasure this ship anker because I created it long ago with a kit from Prima that is no longer available and was saving it for the perfect make. It originally was a cardboard piece. Even though this rusty effects kit is no longer available you can create the exact same rusty outcome using Distress Grit Paste and Paints. First, cover the cardboard piece with Distress Grit Paste and allow it to completely dry. Next select three paints, one brown, one orange and one yellow. Using a stipple effect with a paint brush, paint on the three colors in random areas starting with the yellow paint first. Allow the yellow paint to completely dry and then stipple on the orange paint in random areas over the yellow. Allow this layer to completely dry and then stipple on the brown paint in random areas. Allow this layer to completely dry. When your piece is completely dry look at it and see where you need to add more yellow, orange or brown to get the look of rust. It takes practice and patience so don’t give up! Paint is very forgiving and you can work over it layer by layer. Just make sure to dry each layer of added paint completely or all you will end up with a muddy colored mess.
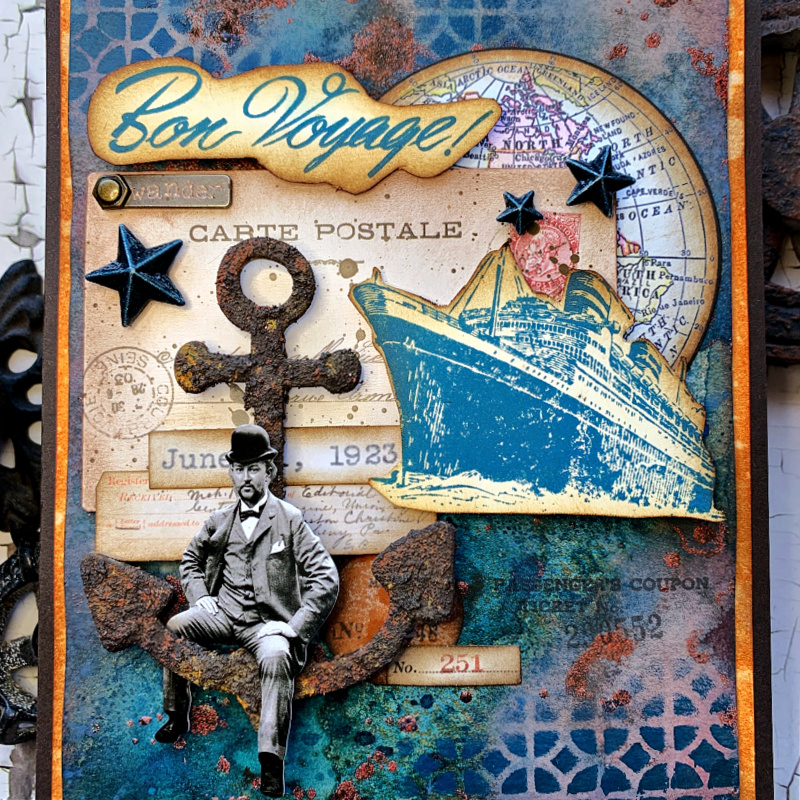
Above you can see how I arranged all my pieces together over the main card panel.

To complete the card, I cut a 5-1/4″ x 7-1/4″ piece of cardstock and inked the edges with Rusty Hinge Distress Ink and then spritzed it with a bit of water and adhered my main card panel over top using 3D foam pieces. I took this entire piece and adhered it to a 5-1/2″ x 7-1/2″ piece of Simon Says Stamp Dark Chocolate cardstock and the card is done!
I hope you enjoyed seeing how I put this card together and that you love Uncharted Mariner as much as I do. Thank you so much for sticking with me to the end and spending your time with me here on my blog. I really appreciate it!
Have an amazing week!

Tim Holtz Stampers Anonymous Artful Voyage Stamp Set
Tim Holtz Stampers Anonymous Mini Focus Layering Stencil
Tim Holtz Ranger Uncharted Mariner Distress Spray Stain
Tim Holtz Ranger Uncharted Mariner Distress Oxide Spray
Tim Holtz Ranger Rusty Hinge Distress Spray Stain
Tim Holtz Ranger Rusty Hinge Distress Oxide Spray
Tim Holtz Ranger Uncharted Mariner Oxide Ink
Tim Holtz Ranger Uncharted Mariner Embossing Glaze
Tim Holtz Ranger Uncharted Mariner Distress Paint
Tim Holtz Ranger Vintage Photo Distress Ink
Tim Holtz Ranger Ground Espresso Distress Ink
Tim Holt Idea-ology Mini Paper Dolls
Tim Holtz Idea-ology Memoir Ephemera Pack
Tim Holtz Idea-ology Number Strips Ephemera Snippets
Tim Holtz Idea-ology Findings Hex Fasteners
Tim Holtz Idea-ology Findings Adornments Stars
Tim Holtz Idea-ology Story Sticks
Simon Says Stamp Dark Chocolate Cardstock
Tim Holtz Ranger Distress Resist Spray
Tim Holtz Ranger Opaque Grit Paste
Tim Holtz Ranger Ink Blending Tool


Love this! Did you pluck that anchor from the sea ; ) ’cause it looks so real!
Hi Nancy! Thank you for your sweet comment and no, I made the anchor which was originally a cardboard piece.