
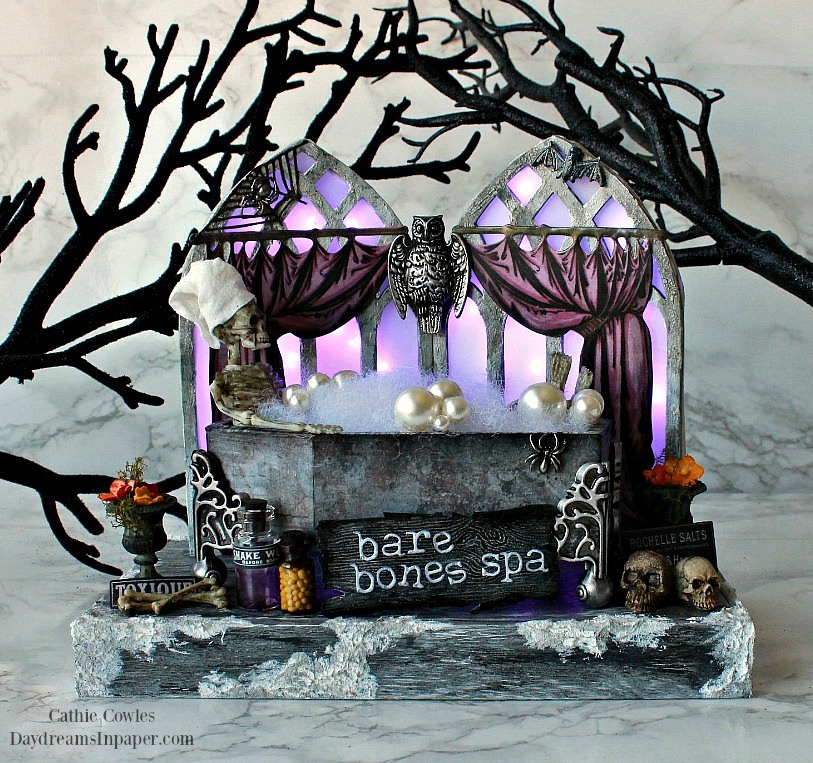
Hi Friends! The time I’m able to spend in my studio is very limited. I’m still raising the last of my 5 kids but for almost 3 years I’ve been babysitting my grandchildren while my daughter-in-law finishes her physical therapy degree. I’m exhausted most of the time but who among us isn’t, right? I’m not complaining because I know how important it is to live in the now and whether I’m tired or not, I try to enjoy each and every minute of every day. Even though my time is limited right now, I still need to get in my studio and do something. It’s what makes my veins flow and my heart pump. I know you know, right? When I can’t get in there, it’s like this invisible force is pulling me in the direction of my studio and so instead of ignoring it and feeling my soul die a little every day, I’ve decided that even if I only get 5 minutes, then that’s what I get and I’m going to make the most of it. It’s like a shot in the arm and it’s the best decision I’ve every made. This project was created doing just that. When you see the tiny bottles, that’s what I worked on one day or the flower vases, that was done the next day. So slowly, slowly, this project came together. This scene has two pieces. The tub removes away from the “stage”, so to speak. This way you can use the stage area year after year with a different theme or you can change the theme throughout the same season. It’s just a fun way to keep things new without having to start a whole new project from scratch. I hope you like it.
Creating the “Stage”
- Cover a Tim Holtz Vignette Tray (the largest) with white gesso and allow to completely dry.
- When the gesso is completely dry, paint the outside of the tray with Hickory Smoke Distress Paint and allow to completely dry.
- Next, dry brush the outside of the tray with Black Soot Distress Paint using very delicate and light handed strokes and allow to completely dry.
- Cover random areas of the tray with Grit Paste and allow to completely dry.
- When the Grit Paste is completely dry, apply some Hickory Smoke Distress Crayon onto a craft mat and spritz with water. Dip your fingertip into the pigment and dab onto the dry Grit Paste and allow to completely dry.
- Next, apply some Black Soot Distress Crayon onto your craft mat, spritz with water and dip your fingertip into the pigment and very gently dab over the Grit Paste. You don’t want to cover the gray colored areas, you just want to add depth by making some of it a bit darker than others.
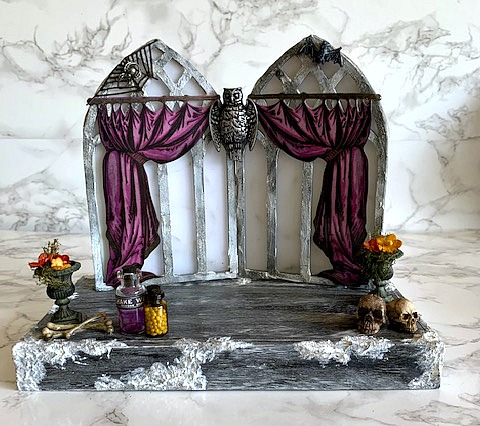
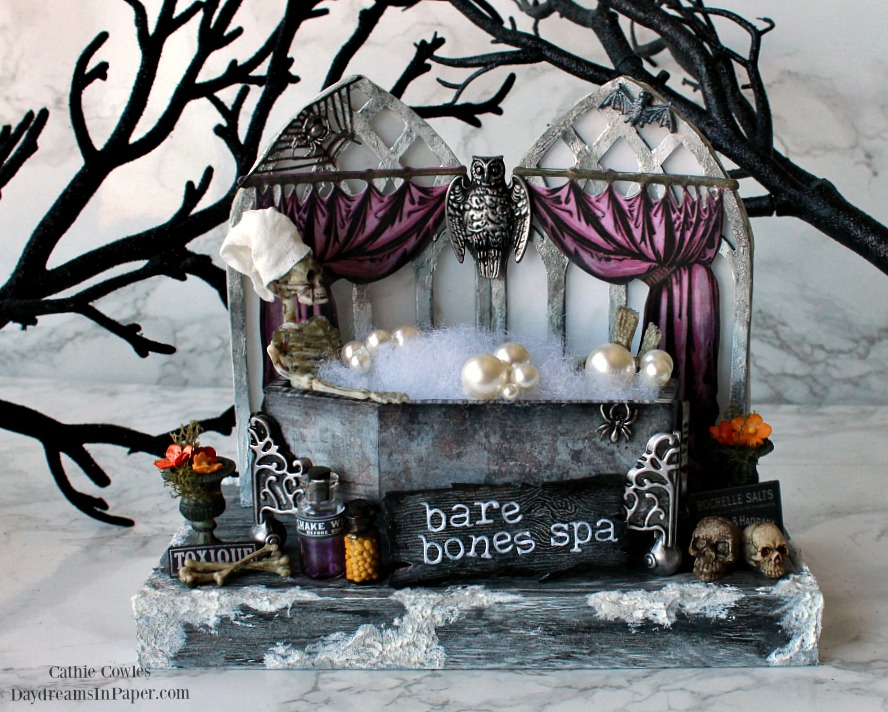
Creating the Cathedral Windows and Adding Purple Halloween Lights
- Using two Tim Holtz Cathedral thickboard pieces, place them over clear vellum and trace around the edges. Cut out the design from the vellum and set aside. Complete this same tracing process with thick white cardstock as well. (You will use the white cardstock pieces when adding the lights.)
- Cover each Cathedral thickboard piece with white gesso. Make sure to cover the inside edges of the windows with white gesso also. Allow them to completely dry.
- Next, apply Distress Crackle Texture Paste to random areas of the window and allow to completely dry. I set mine aside to dry for several hours.
- Now that the crackle paste is completely dry, apply Hickory Smoke Distress Crayon onto a craft mat and spritz with water. Dip your fingertip into the pigment and dab onto the cracked areas. Do the same with Black Soot Distress Crayon in random areas to create some depth. Allow to completely dry.
- Adhere the traced out clear vellum pieces you created in step 1 to the back of each Cathedral piece.
- To add the lights to the back of the Cathedral thickboard pieces, apply two layers of 3D foam tape to the back of each window. Only apply the 3D tape to the back of the thickboard areas so you can’t see any of the tape when the lights are turned on.
- Next, take the two white cardstock traced Cathedral pieces that you created in Step 1 of “Creating the Cathedral Windows” and adhere one set of Tim Holtz Purple Halloween Lights to each piece. Make sure to leave enough space along the edges so you can adhere it to back of the Cathedral thickboard windows.
- Remove the backing from the 3D foam pieces that you adhered to the Cathedral thickboards and carefully adhere that onto the traced out Cathedral white cardstock windows with the lights.
Finishing the Outside Edges of the Windows
- When the windows are all assembled, you will notice that you can see inside the two layers of the windows exposing the lights and 3D tape. To cover this, apply collage medium around the outside edges of the windows and apply trim tape. I do this in sections because the collage medium dries very fast. Apply another coat of collage medium over the top of the trim tape to seal it and so that it will stay in place.
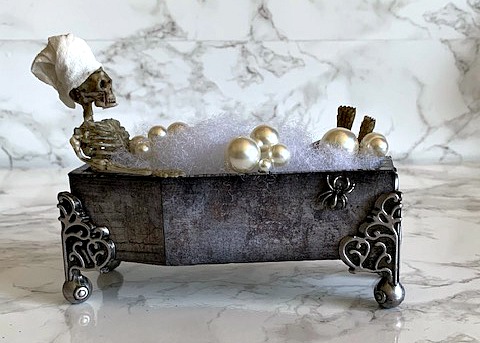
Creating the Bathtub
- Measure the all the sides, inside and out, of the vignette coffin and cut each piece out of Tim Holtz Departed paper stash cardstock.
- Working in sections, cover one side with collage medium and place the coordinating piece of cardstock over the glue. Next, brush a top layer of collage medium over the top of the cardstock to seal and set in place.
- Continue this process for all the sides, inside and out, and allow to completely dry.
- Brush collage medium on the top edge of the coffin where you can still see wood and apply trim tape. Apply a top coat over the trim tape to seal and set in place.
- Using and ink blending tool with Black Soot Archival Ink, ink all the edges of the coffin.
- For the feet of the bathtub I used Tim Holtz Foundations. Paint each piece with Black Soot Paint and allow to dry. When completely dry, rub over the raised areas of each Foundation piece with Prima Old Silver Metallique Wax.
- To create the skeleton, use a full body skeleton and dab the entire piece with Mushroom alcohol ink to give it a more aged look.
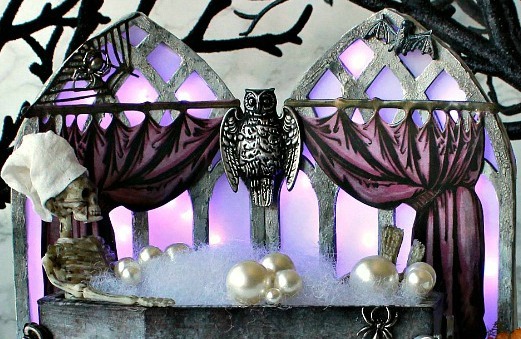
- To create the bath towel wrapped around the skeleton’s head, I cut a rectangular piece from a Kleenex hand towel and wrapped it around the skull and secured it with a glue dot and some hot glue.
- Next, cut the legs off the skeleton and adhere the top half to the coffin as shown below. Adhere the legs to the bottom half of the coffin in a crossed fashion or however you want.
- Fill the bathtub with batting all around the skeleton and into the tub.
- Adhere Tim Holtz Baubles inside the tub in random areas to look like big bubbles.
- Adhere a tiny spider to the tub that has been rubbed with Prima Old Silver Metallique Wax.
Putting on the Final Touches
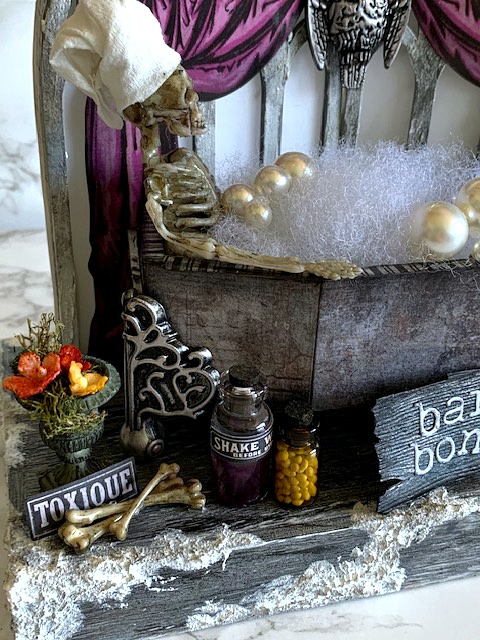
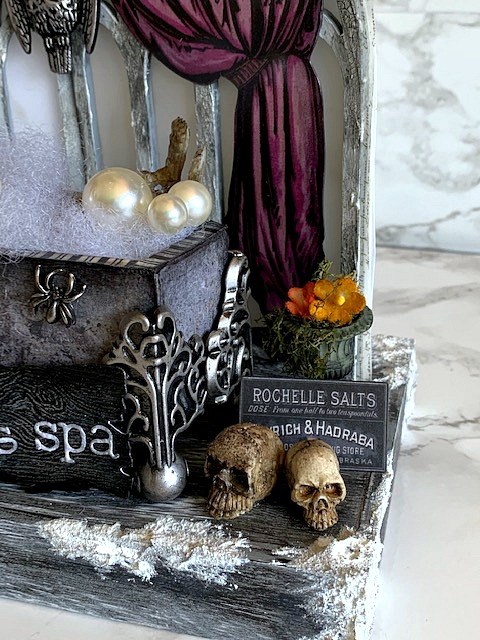
- To finish off the setting, I colored some Tim Holtz Grave Relics with Mushroom Alochol Ink and filled them with dried moss that was colored with Peeled Paint Distress Spray Stain. I added a few Tim Holtz Bouquet flowers that were colored with Crackling Campfire and Fossilized Amber Distress Spray Stain.
- I added a couple of Tim Holtz Idea-ology Skulls and a few bones that were colored with Mushroom Alcohol Ink.
- I added an Idea-ology Apothecary Bottle filled with mini art stones and an Idea-ology Corked Vial that I colored with Boysenberry Alcohol Ink.
- I placed a couple pieces of Idea-ology Halloween Snippets and created the bare bones spa sign from the Sizzix Bigz Planks die cut out of woodgrain paper that was colored with Black Soot Distress ink and rubbed with Prima Old Silver Metallique Wax.
I hope you enjoyed seeing how I put this Halloween piece together and that you will forgive me for not having step-out photos that would make it easier to understand some of the instructions. If you have any questions, or you’re interested in better understanding some of the steps because I didn’t explain them well, please, please don’t hesitate to contact me through my blog or on Instagram. I would be so happy to help better explain a step or whatever question you may have. Thank you so much for sticking with me to the end and spending your valuable time with me. I so appreciate it beyond words. Have an awesome rest of your week!!
Here are a few more close-ups of my project.
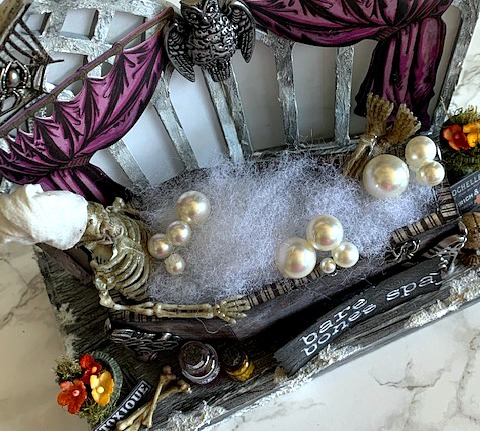


This is incredible! I loved seeing the “stage” that could be used in so many ways. The skeleton in the bathtub is so full and so clever and the use of the batting is just genius…it really looks like suds!
Completely unique and totally fabulous, I love this!
So, so cool, I just love it…Your directions are very understandable. I can look at the main pictures and fill in anything not covered. Thanks for the directions…still laughing….
I do have one question…how tall was the skeleton that you used?
Hi Sherry. The skeletons are approximately 5-1/2″ in length and made of plastic. I purchased them a long time ago and they came in a package of 8. You can find them just about anywhere this time of year.
This is just fantastic! Absolutely love this and your great sense of humor. The towel on the skeleton’s head had me cracking up! Great project.
This is awesome, love all the details.